Art Projects Grades 2 and 3, Art Projects Grades 4 and 5

Silhouette birds

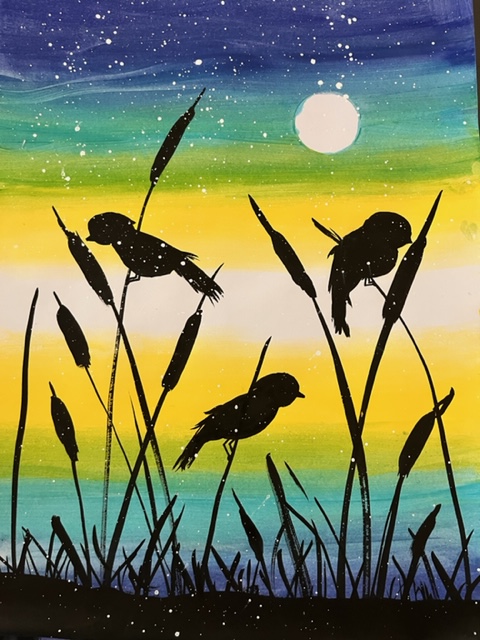
This project worked great with Grade 3, but can be done with any grade. We made birds, as I wanted to focus on simple basic shapes kids could easily do (in this case two circles and a triangle) but I have done any other drawing kids like, such as dinosaurs, jelly fish, jungle animals, ballerinas, beaches….. this is pretty flexible.

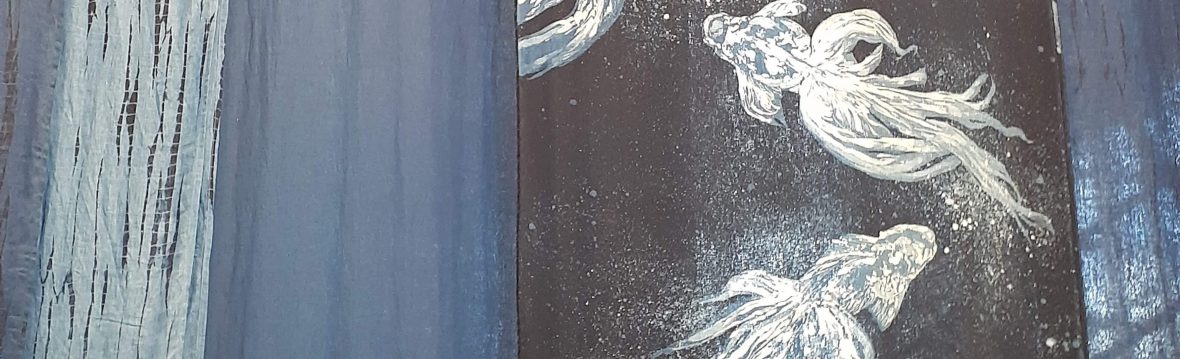
We started by painting the background, each table got a mix of 3 colors, some got blue/purple/white, others yellow/blue/white and others orange/yellow/white.

Demonstrate how to blend in the colors, starting with the center painted with white. From there move up and down using the same colors (as it would be in a reflection, look sample), blending from light to dark. Let dry. We also stuck a circle with tape at the top before painting, this was a moon. It worked ok for most kids. If it did not work out once dry they painted again with white acrylic.

We used black Chinese Ink to draw grass, some long almost touching the top and the bottom covered with black and shorter grass. Students also drew 3 or 4 birds around, we practiced one class using our sketchbooks and then we moved on to the painted background. If students did not feel confident using the brushes and ink, I let them draw the birds with markers once the grass was dry. About 3/4 of the class did with a brush. Skip the beaks and legs, you can use markers for those as it can be tricky for little hands.

Once dry I let them splash white acrylic paint on top. I heard a lot of good compliments from parents, many had to go buy supplies as the kids wanted to repeat at home!

Enjoy.

Art Projects Grades 4 and 5, Middle School Art

Amazing Oil Pastel Animals (using a simple trick)

These wonderful project could be done with kids from Grade 4 and up to High School. The pictures shown are from my Grade 4 students.

We used a simple trick to transfer an accurate outline of the animal’s features, and that makes a world of difference. The Pop Art Self-Portraits project uses the same trick.

Start with pictures of different animals, this project was done on light brown cardboard, so I went for brownish animals. I handed pictures of a cat, a tiger, an owl and a fox. I printed both a color copy and B/W copies. The color copies I placed in a plastic folder and plan to use them again in the future, but each kid got a B & W copy for their own use. Start by coloring the back of the B&W picture with a pencil, all of it. It should look all gray. Once that is finished, place the picture, right side up on top of the paper where your art will be, in my case brown cardboard as big as the pictures I handed. You can secure with a couple paper clips or repositionable tape, it helps. Once secured, trace the OUTLINE of your animal, making sure that all is well traced on top. Please refer to the Pop Art project to see pictures of this process. The eyes, irises, light reflection and snout are the most important features, once they are arranged accurately, the rest of the animal comes together in a flash.

I explained to the students that when we work with oil pastels, we work with the middle colors first and then we move to the light and dark shades. Using brown paper helps a lot, as it is the middle color for all of the animals I chose, they needed to observe the color picture and work with the lighter / darker colors, making sure to refer back to the color picture as they work. They should also follow the outlines they will find in their art paper (transferred using the “magic trick”). Kids were a little surprised with their finished animals, now and then I see them using the magic trick for other purposes, which I think is wonderful!

Enjoy.

Art Projects Grades 2 and 3, Art Projects Grades 4 and 5, Middle School Art

Fruit Mosaics

This lesson plan can be adapted to any grade level and it is fantastic a fantastic way to exercise focus and spatial thinking skills.

Sketching with real fruit helps students to pay attention to detail and enhances observational skills

One class I brought real fruit for the students to sketch. I asked to take not on the imperfections and light as they drew, once outlined they colored with coloring pencils; this step is not needed to make a mosaic but I like to do projects focusing on different angles. Next class we outlined a fruit, could be the one we choose last class or another one; I asked them to make the fruit filling most of the paper in this case it was a A4 sized cardboard. Once all of the students have their fruit outlined, I explained the basics of mosaics, basically we work with squares the whole time until we come into a space where the square does not fit, in that space, we use a pencil to trace where exactly should we cut the paper to make it fit, then cut and stick. When the fruit was done, I asked them to use a contrasting color for the background and continue filling the space in the same manner.

This activity, be warned, demands a substantial amount of patience, which makes it a great activity for the students, have you noticed the more screen time, the less patience they have?

Here are some pictures, from my grade 3 students.

Enjoy!

Art Projects Grades 2 and 3, Uncategorized

Reindeer Portraits

This slideshow requires JavaScript.

This is another fun winter project suitable for elementary students, in this case, it was grade 3 students (I can see their sketching skills improving substantially!).

We talked about different winter animals that have antlers and explained that antlers fall off every year, and regrow a brand new (and bigger) set again.  This is pretty much know off in some parts of the world, but when I first heard about it I was shocked, and so were my students, they actually didn’t believe me at first!

I handed different photos and drawings of reindeer.  They selected on of their liking and went ahead to sketch it as big as possible in a piece of blue cardboard.

Once they were happy with their sketch, they outlined it with a black wax crayon.  I used regular crayons in the past, until I found this inexpensive treasure:

IMG_7156

These type of crayons allow neater and straighter lines, and I love them. I just remind my students to stay clear of the white tread (PLEASE IGNORE THE WHITE THREAD AND DO NOT TOUCH IT), or they would LOVE to peel off the whole crayon in 5 seconds.  So far, I have not had any with them, but be pretty clear about it.

Once it is all outlined (I also request to fill in the eyes and the nose), they can go on and paint with temperas, I handed palettes with white, light and dark brown and golden paint.  Let dry.

To finish this project let them splash white paint and/or add stars using yellow paint.

I so much enjoy seeing my students’ personalities reflected in their work somehow…..

Enjoy it!

Art Projects Grades 4 and 5, Uncategorized

Bears in a Storm

This slideshow requires JavaScript.

This is a wonderful winter project for elementary students, in this case, grade 4.

We started by sketching a bear on a piece of cardboard, I handed photos and drawings of different types and styles of bears, so they could choose something of their liking. They were then asked to enlarge and sketch in the cardboard “as big as the paper is”, so the top of the sketch needed to reach the top of the paper and so on.  This is quite challenging for young students, but is a great sketching exercise.  I always remind to them to sketch lightly, we should be able to erase “without seeing a trace” and to identify basic shapes inside our object.  Draw those basic shapes first, then add details until your sketch resembles your object.  Once the sketch was completed, they painted it roughly (uneven strokes will add texture) with brown tempera and immediately outlined it with black paint.  We then prepared the background, using a black piece of cardboard and white acrylic paint.  Students painted a ground level covered with snow and added snowflakes, dots and/or a moon.   Once both papers were dry, they cut out the bear and glued it up on the black cardboard. I asked them to play with it a bit before deciding where would it look good, so it move around before you decide for the right spot! Add more snow with white tempera once you glued up, just make sure there are no parts left popping up, it should look as ONE piece of paper, for this particular project I handed toothbrushes and a Popsicle stick.  Dip in paint then splash a “storm”. Make sure you model the right direction, they instinctively slide the stick from up down, and that splashes paint straight to the face!

Enjoy it!